
We developed this guideline to make it easier for the fabricator to work with ASTARIGLAS®.
ASTARIGLAS® acrylic sheet is the most versatile material in the workshop because its properties make it very suitable for various purposes, from precision engineering components to domestic and commercial products. Some of the many applications are signs, glazing, safety screens, roofing, lighting fittings, medical and research apparatus, furniture and craft work.
ASTARIGLAS® is manufactured in two forms: cell cast sheet and extruded sheet. Cell cast sheet is available in a wide range of thicknesses and colours. The extruded sheet, ASTARIGLAS® XT, is available in clear, in a range of opal colours and a limited range of transparent colours.
Differences in the performance of cell cast and extruded acrylic sheets arise from the nature of the polymer. There is a longer molecular chain in cell cast sheet than in the extruded product. This guideline draws attention to areas where the service behaviour of cast and extruded sheets may differ otherwise, that the information given applies to both products.
ASTARIGLAS® is a combustible material, and naked flames should not be allowed to come into contact with it because ignition may occur (Except in the case of flame polishing which is carried out under controlled condition).
Unlike cell cast sheets, ASTARIGLAS® XT extruded acrylic sheets form burning droplets; in other respects, the two products behave similarly. When ASTARIGLAS® burns, its burning rate is similar to hardwoods. Still, unlike wood and similar materials, burning ASTARIGLAS® produces a litter of no smoke and does not continue to smoulder after the flames have been extinguished.
ASTARIGLAS® GP acrylic sheets are supplied with either paper or polyethylene masking. ASTARIGLAS® XT acrylic sheets are provided with polyethylene masking. Paper masking may be challenging to remove if stored for extended periods of time.
The masking helps prevent accidental scratching during normal handling and fabrication operations and should be kept in place for most cutting and machining procedures. Although the masking provides a significant degree of protection against surface damage, the fabricator should avoid sliding the sheets over each other or across rough surfaces. Paper masking should be removed from both sides of the sheet before it is thermoformed.
The adhesion of masking paper on the ASTARIGLAS® GP acrylic sheet may increase over time, making it difficult to unmask. Use older stock first. Recently acquired sheets should be placed behind the older sheets in the storage rack.
Before starting, there are ways to store ASTARIGLAS® Cast Acrylic Sheet. There are many problems occurring when the sheets are not store carefully and properly as they might warp.
Storage | Do’s and Don’tsThe production processes for ASTARIGLAS® cell cast and extruded sheets are fundamentally different, and both materials will exhibit some shrinkage when heated to thermoforming temperature. For example, when the cell cast sheet is heated, it will shrink during cooling. It will be approximately 2% smaller in length and width, with a noticeable increase in thickness. No further shrinkage will occur on reheating, but this initial shrinkage must be considered when preparing the sheet into the desired dimension before thermoforming.
When the extruded sheet is heated, it will exhibit relatively more shrinkage in the direction of extrusion and very little across the direction of extrusion. It isn't easy to give exact figures for the shrinkage of the extruded sheet because this will depend on the thickness and the heating time. Generally, a 2mm sheet will shrink slightly more than 5mm when freely heated, typically about 5%.
When sheets are clamped cold in a frame before heating, the shrinkage is restrained, and the shrinkage of the material during cooling is less likely to happen.
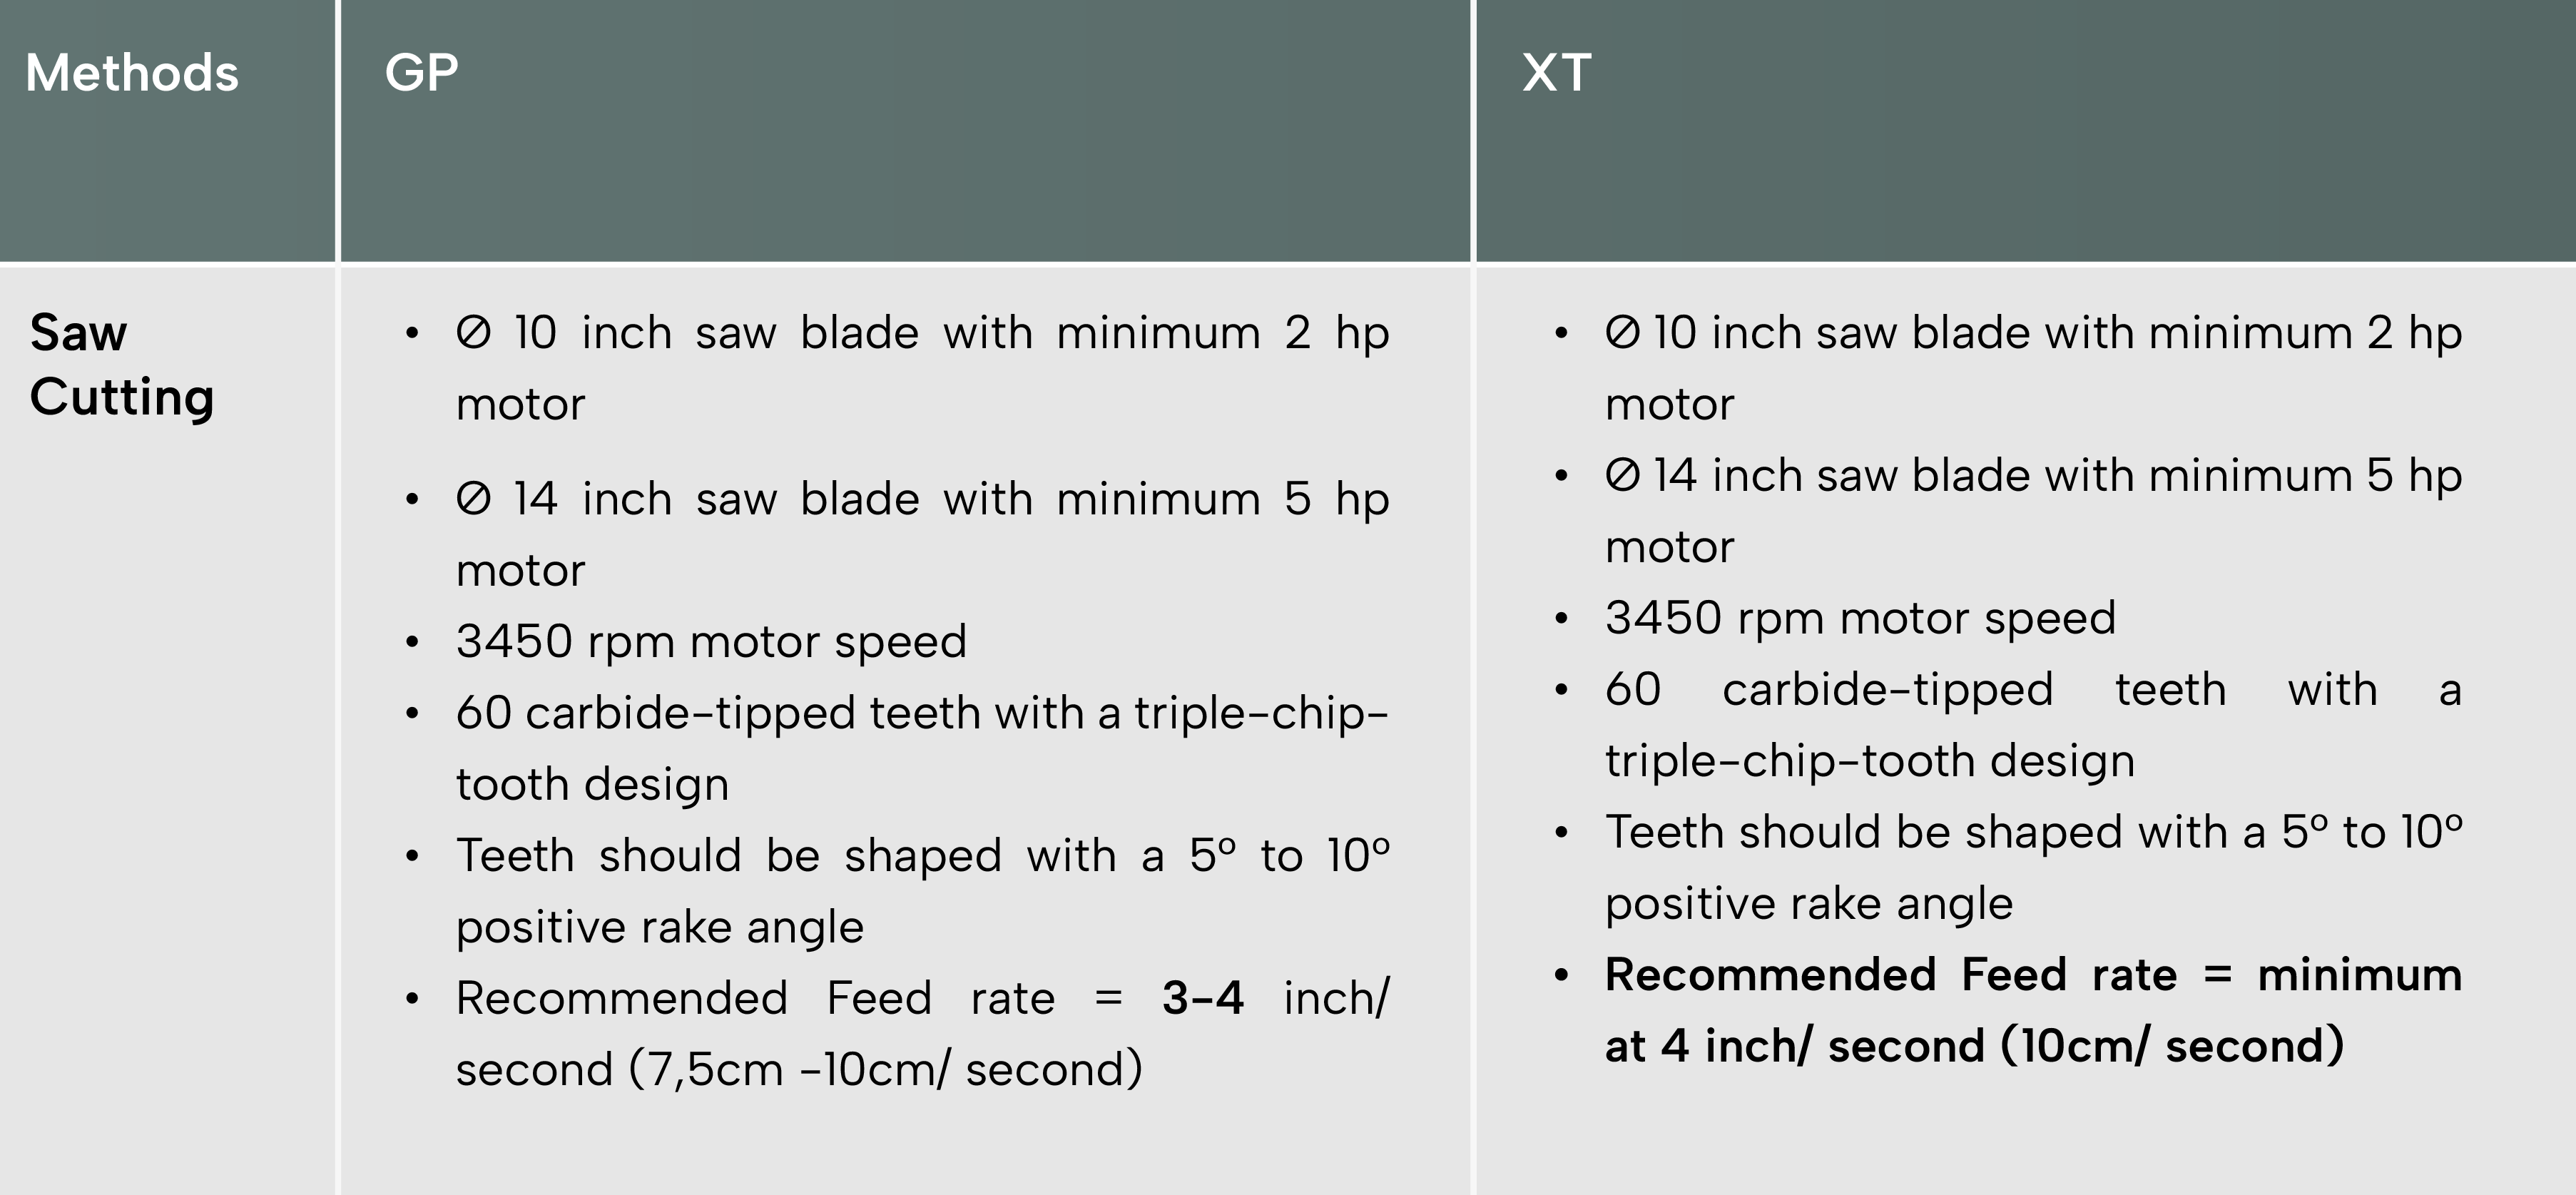
It’s important to have the ASTARIGLAS® well secured while cutting. This can be achieved by using clamps or in this case we are using a handheld saw with a guide. Using this system will give you a straight and even cut and helps holds ASTARIGLAS® down. For the best results use a triple chip blade this will give a fine cut edge ready to polish no need to sand. Using a triple chip blade, you will get a nice even cut. This result will save you time if you need to polish the cut edge.
3. BAND SAWFor all thicknesses of material, the saw guides should be kept as close together as possible in order to reduce the tendency of the blade to twist. This ensures straight cutting and longer working life for the blade. Compressed air should be directed at the point of contact to cool the acrylic and the blade, as well to clear the chips.
4. SCRIBE – BREAKINGASTARIGLAS® up to 5mm thick may be cut in a straight line by deeply scribing one surface with a sharp metal scriber, clamping the sheet with scribed line uppermost and aligned with the edge of a bench, and breaking the sheet by pressing steadily downwards on the free part. In general, however, sawing is a more reliable and controllable method of cutting ASTARIGLAS®.
5. LASER CUTTINGLaser cutting is a compute controlled cutting method. Greater creativity and precision for cutting ASTARIGLAS® are advantages of this method. Thicknesses up to 30mm can be cut although there is some reduction in the quality of the edge finish above 12mm. Laser cut edges can be a high standard with a polish equal to that produced by flame polishing depending on the power and feed rate.
 b. Computerized Numerical Control (CNC) machines
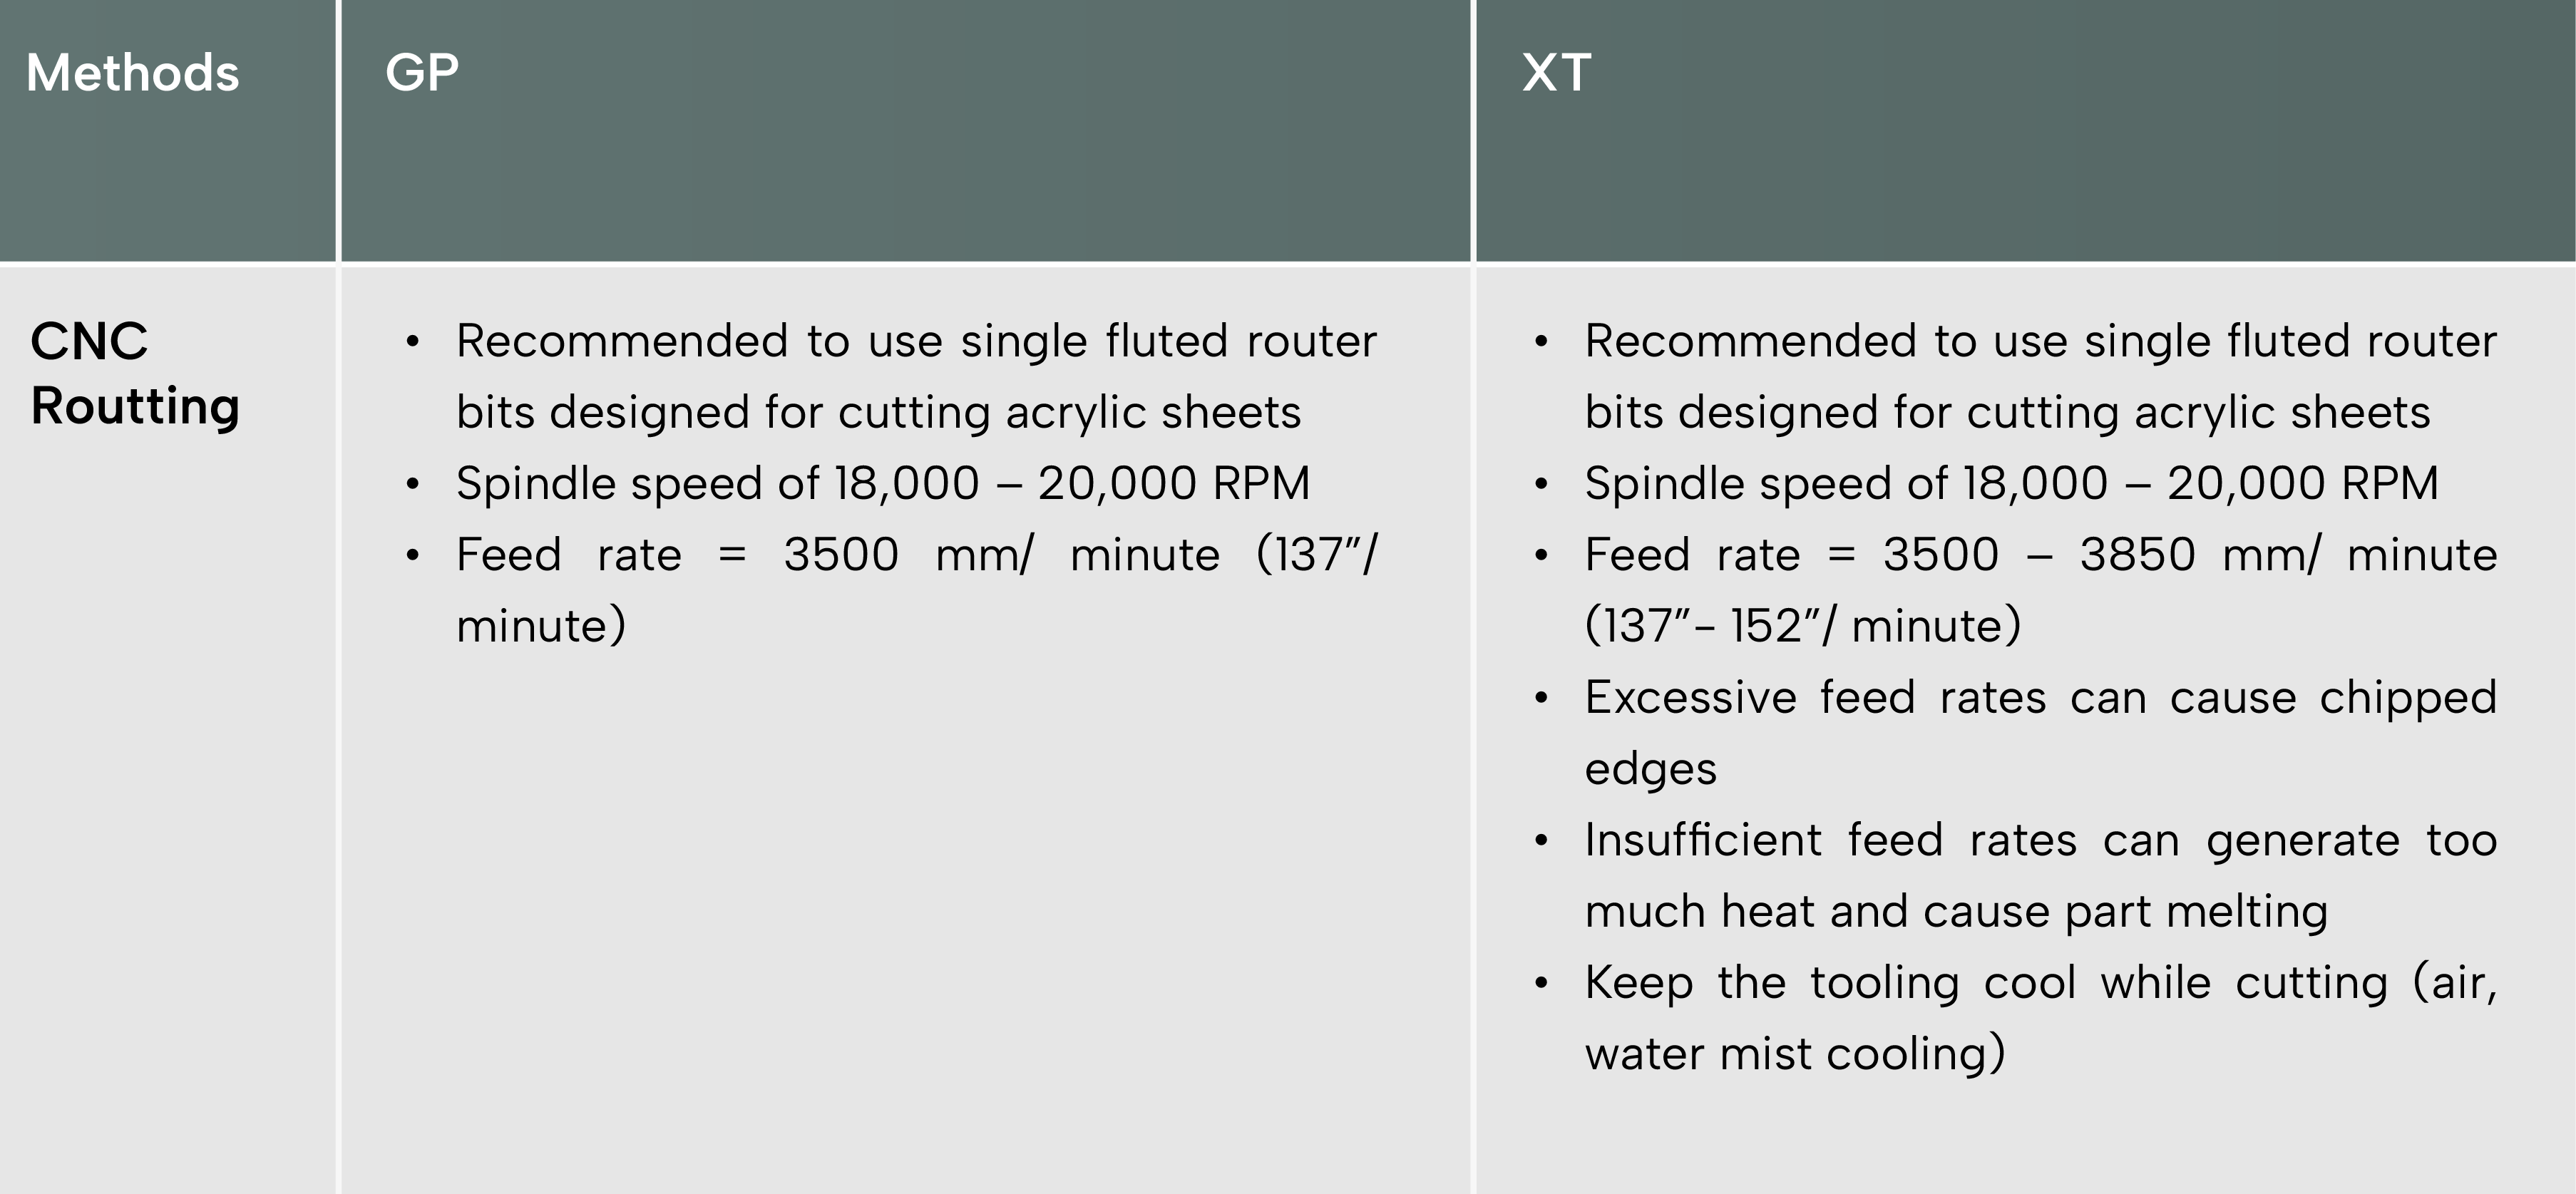
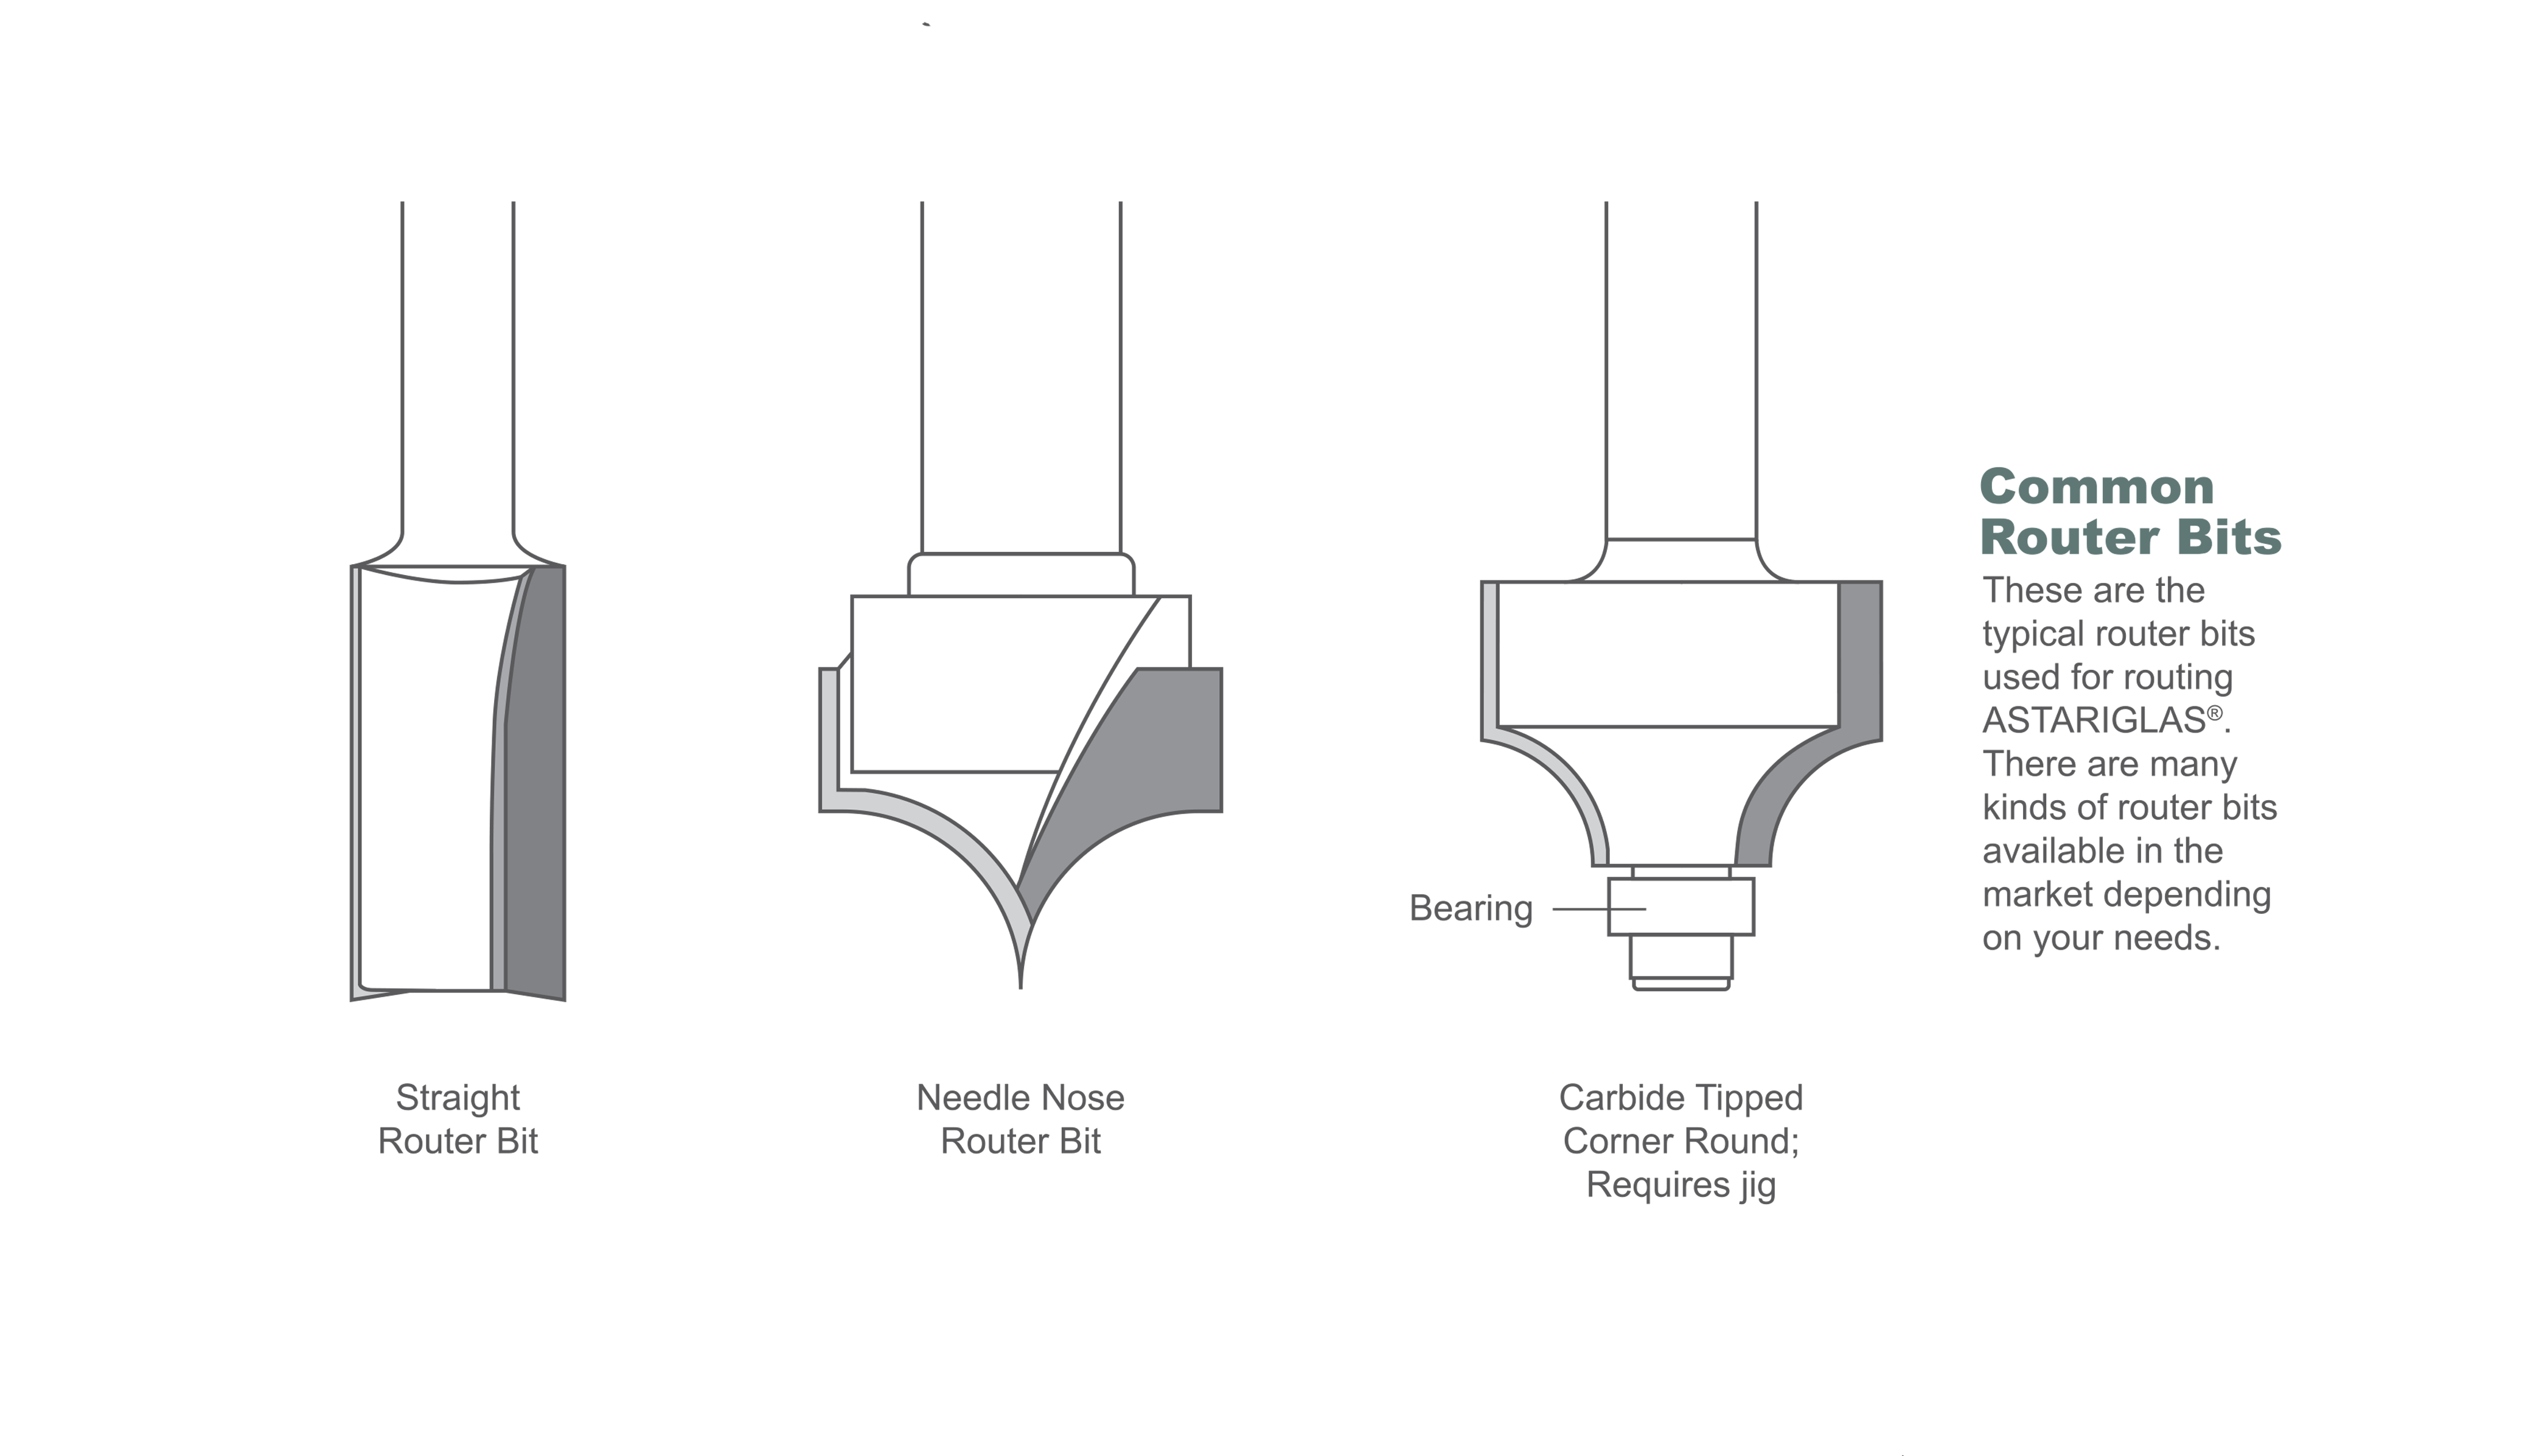
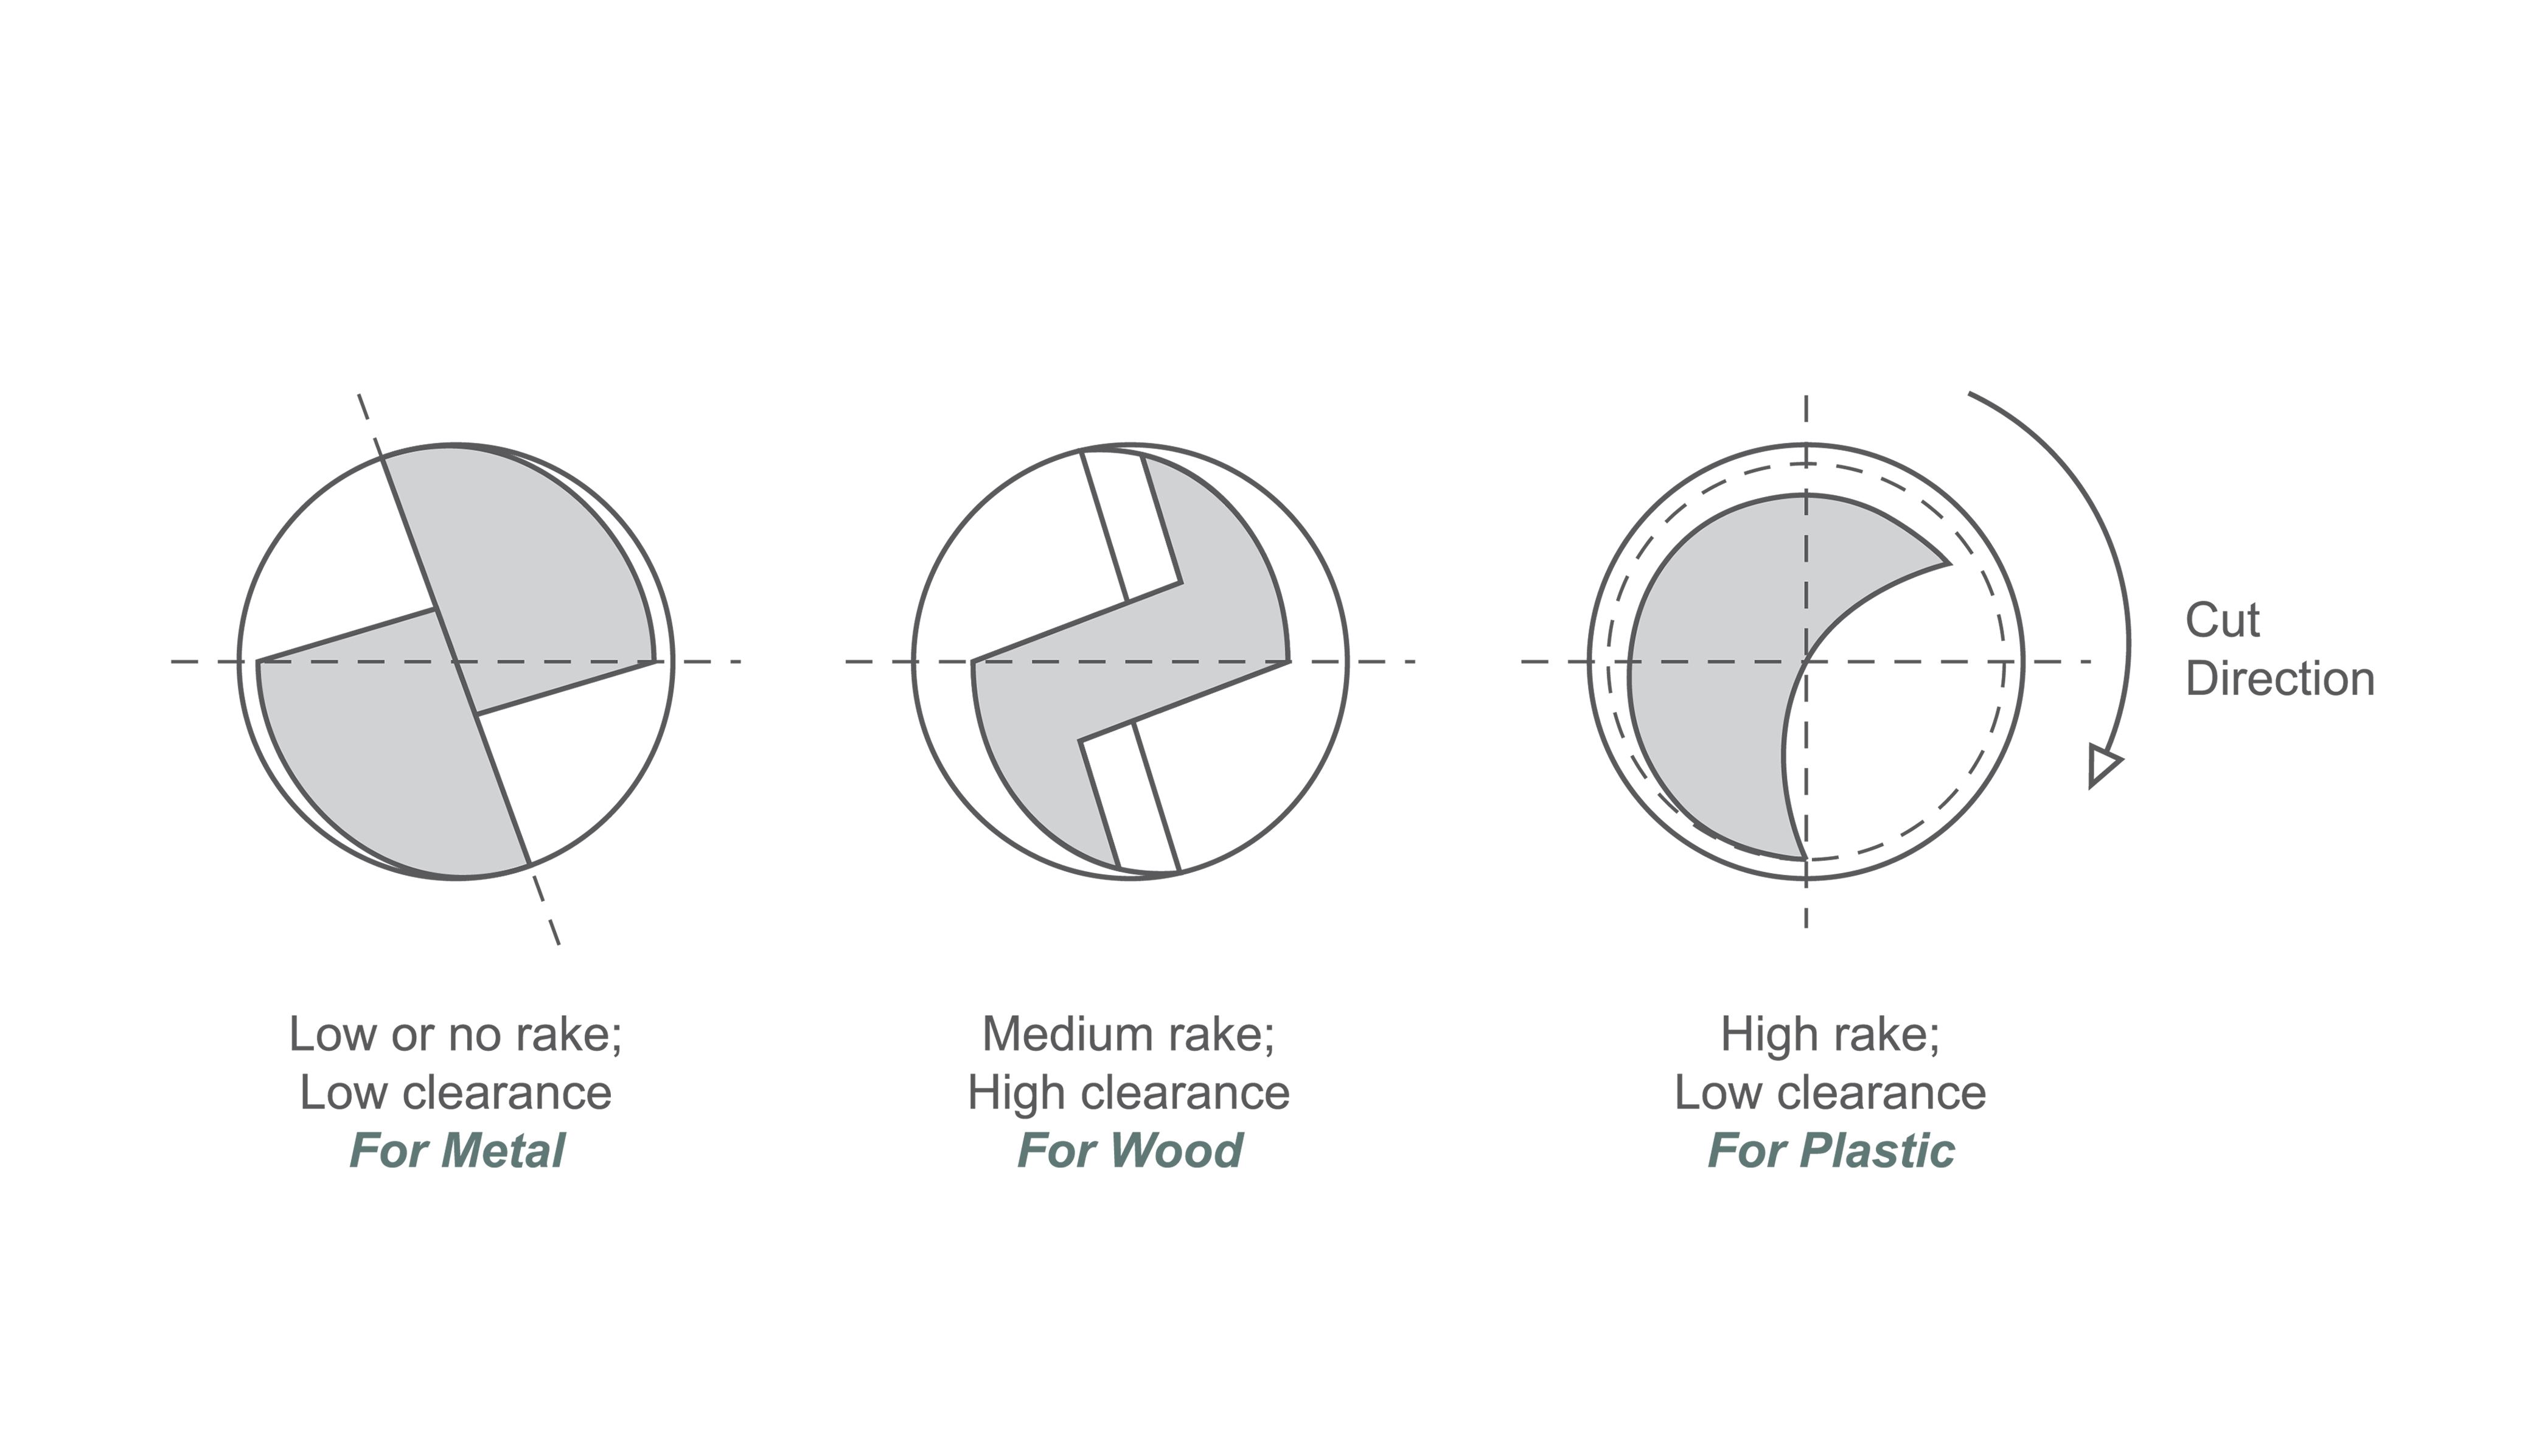
CNC machines are available from several manufacturers for high volume production. Today there are many companies manufacturing CNC routers servicing industries that fabricate wood, metal, and plastic products. As a result, a variety of machine designs are available to fit different job requirements. It is highly recommended to use one flute high rake low clearance router bit to cut ASTARIGLAS®.
 7. PLANING
Planing ASTARIGLAS® can be easy as long you give a few millimeters tolerance. A planer is a tool that spins at high speed that scrape off acrylic edge and if used correctly will give you good results. You will not need to sand the edge after planing ASTARIGLAS®, just wipe clean and the sheets are ready for gluing, hand or flame polish. Planing is one of the fastest way to give ASTARIGLAS® a great finish.
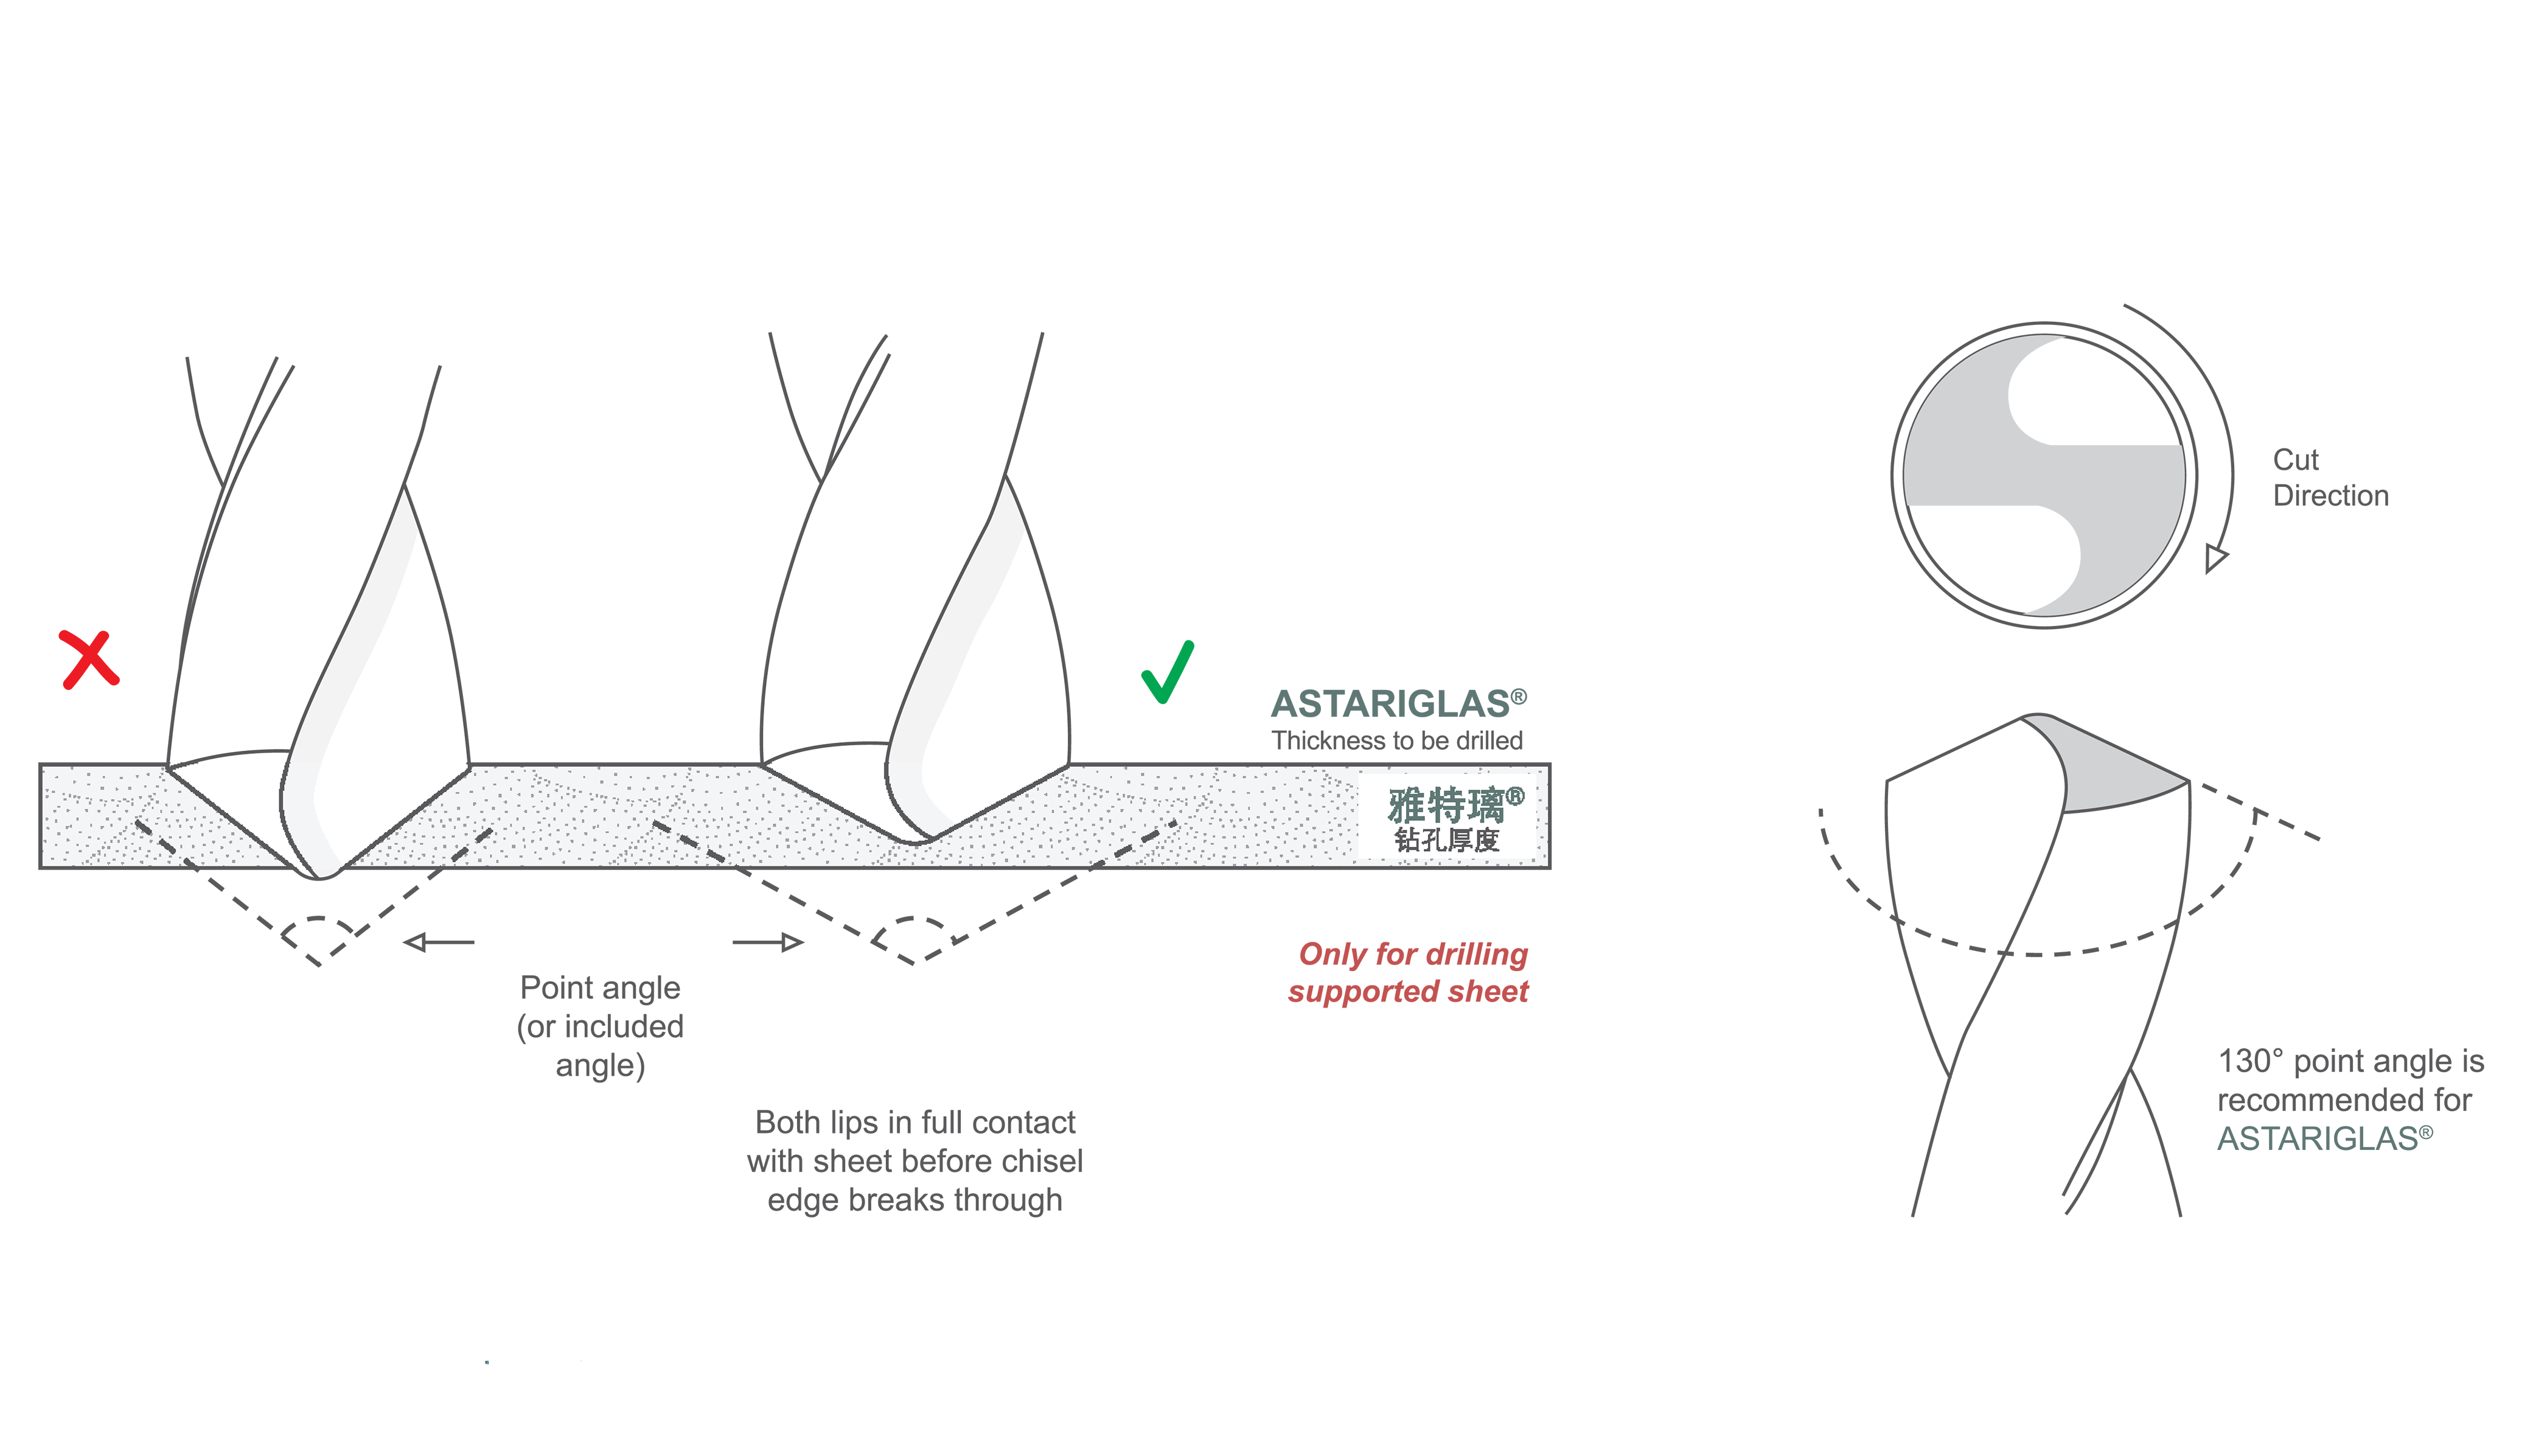
8. DRILLINGDrilling ASTARIGLAS® can be difficult however if you take your time and use the right drill bit you will have success. You must have ASTARIGLAS® supported at all times and reduced the heat generated during the process to a minimum, this will stop the acrylic from flexing while drilling and obtained a well-finished results. You can reduce the heat by applying coolant, adjusting drilling speed and feeds. For drilling thin sheet, the standard included angle of the point may require modification to ensure that the whole of the cutting edge is in contact with ASTARIGLAS® before the point breaks through the sheet. If this precaution is neglected, an untrue hole will result. It is important that the drill point should not penetrate the back surface until the drill flights have entered the top surface. This will reduce the chance of the drill snatching at the acrylic as it breaks through and hence generating notches on the back surface.
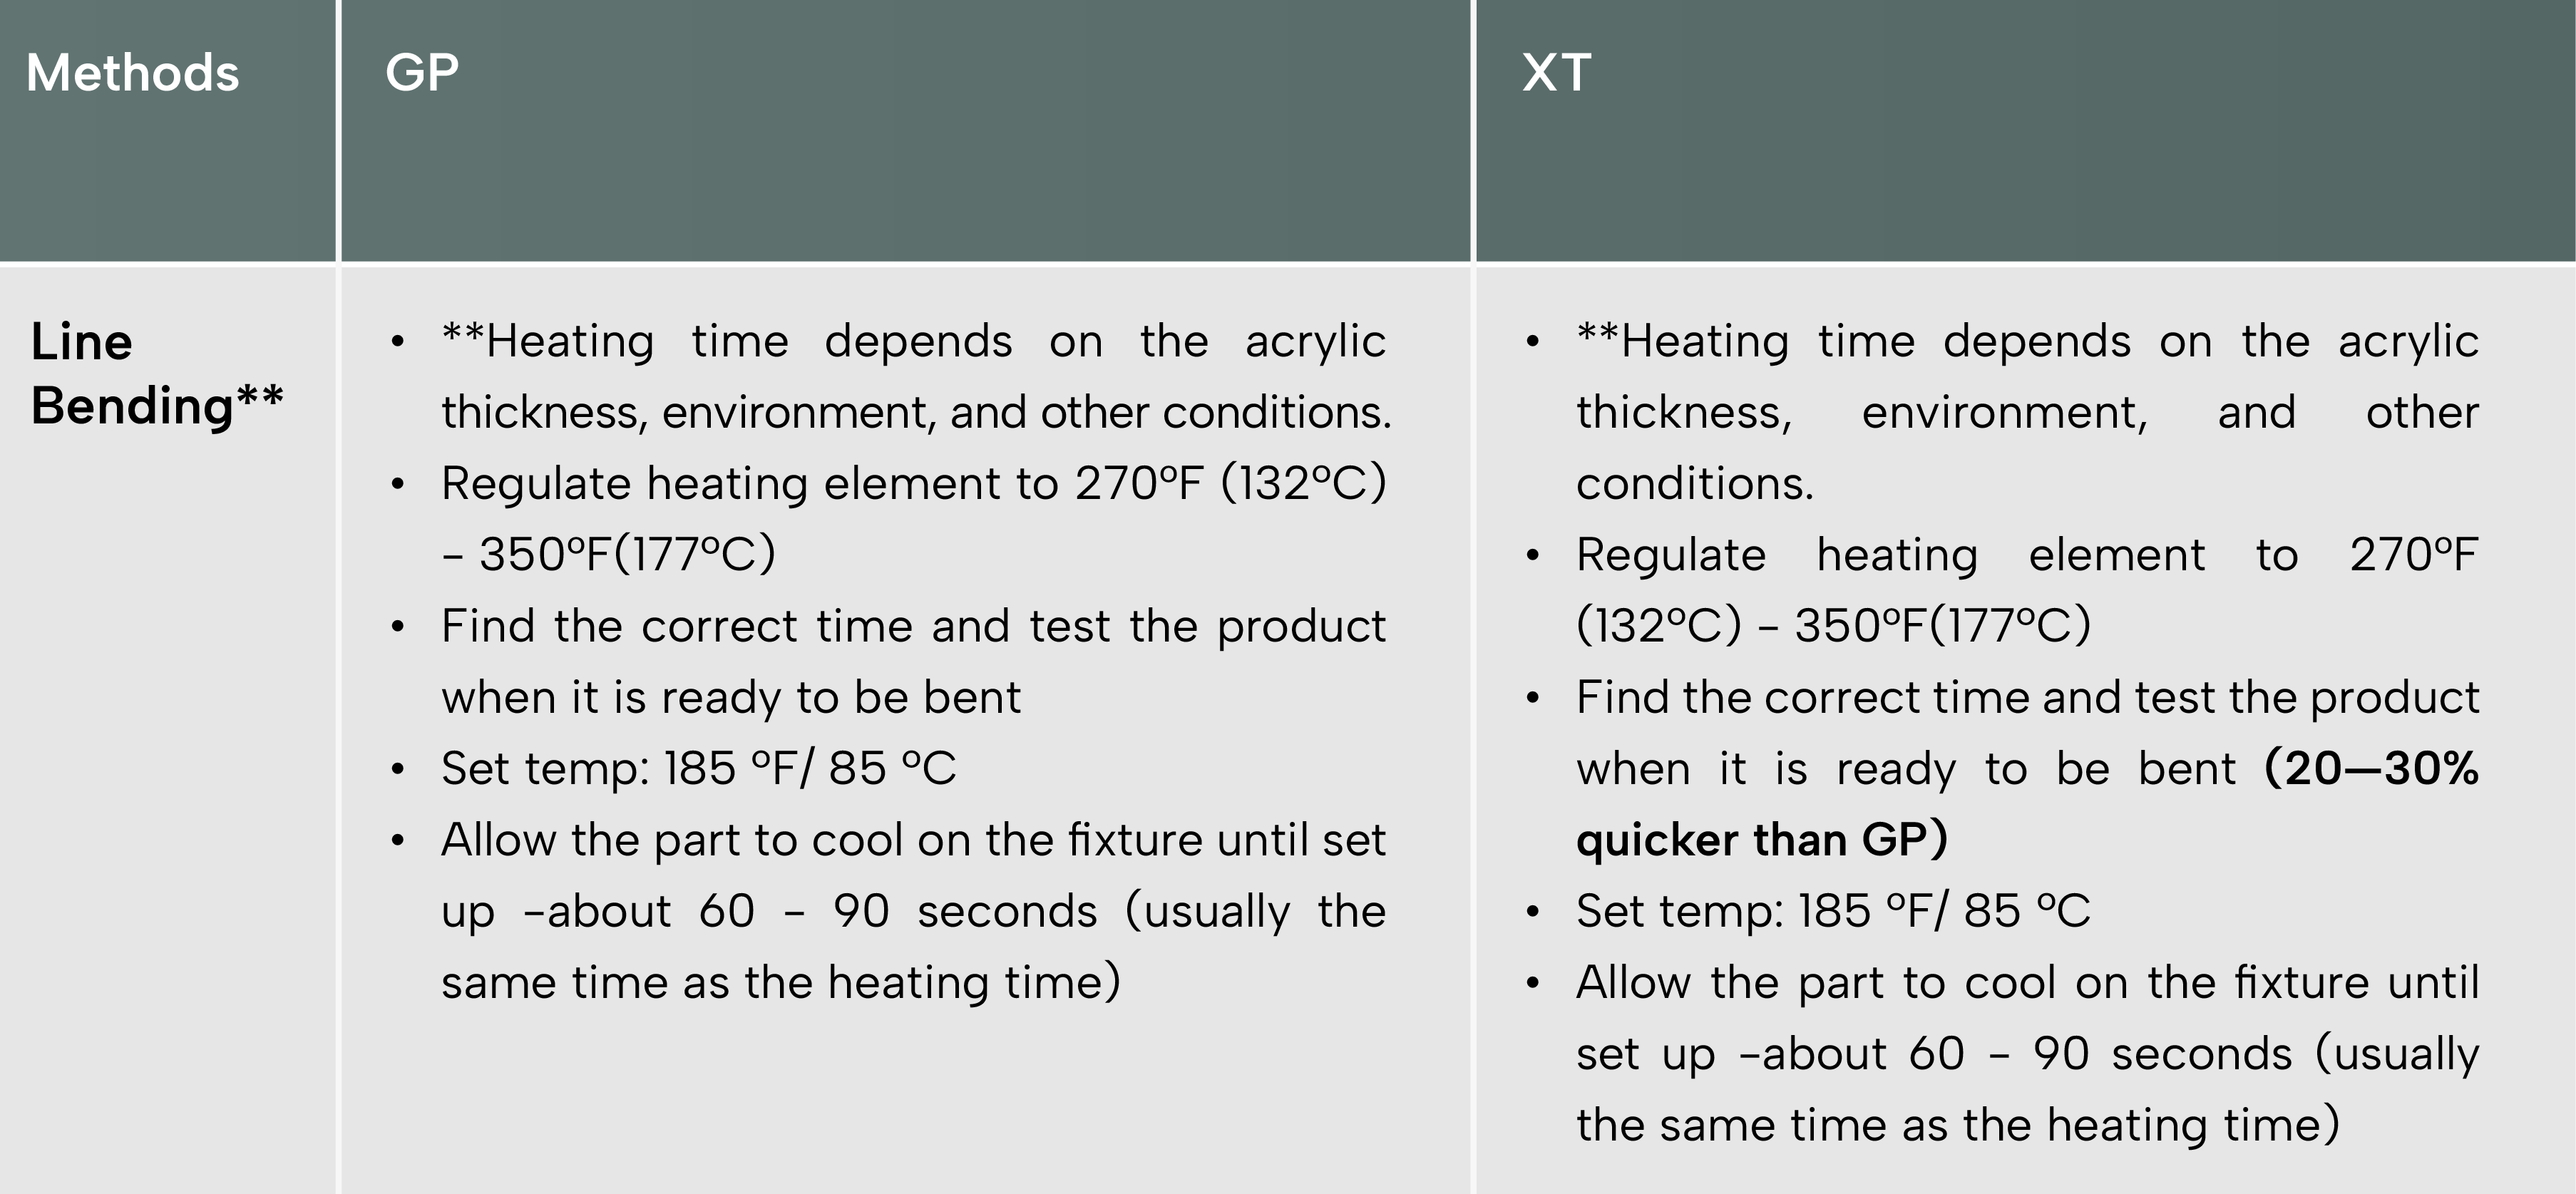
Line bending is a process to bend acrylic in a straight line. It’s a very simple process which is to heat ASTARIGLAS® in a straight line until it can bend easily.
HeatersThere are three types of heating equipment to choose depending on ASTARIGLAS® thickness:
A. Straight Nichrome Resistance Wire Heater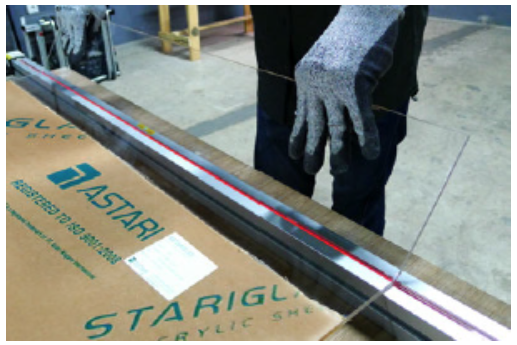 C. Radiant Quartz Tube Heaters
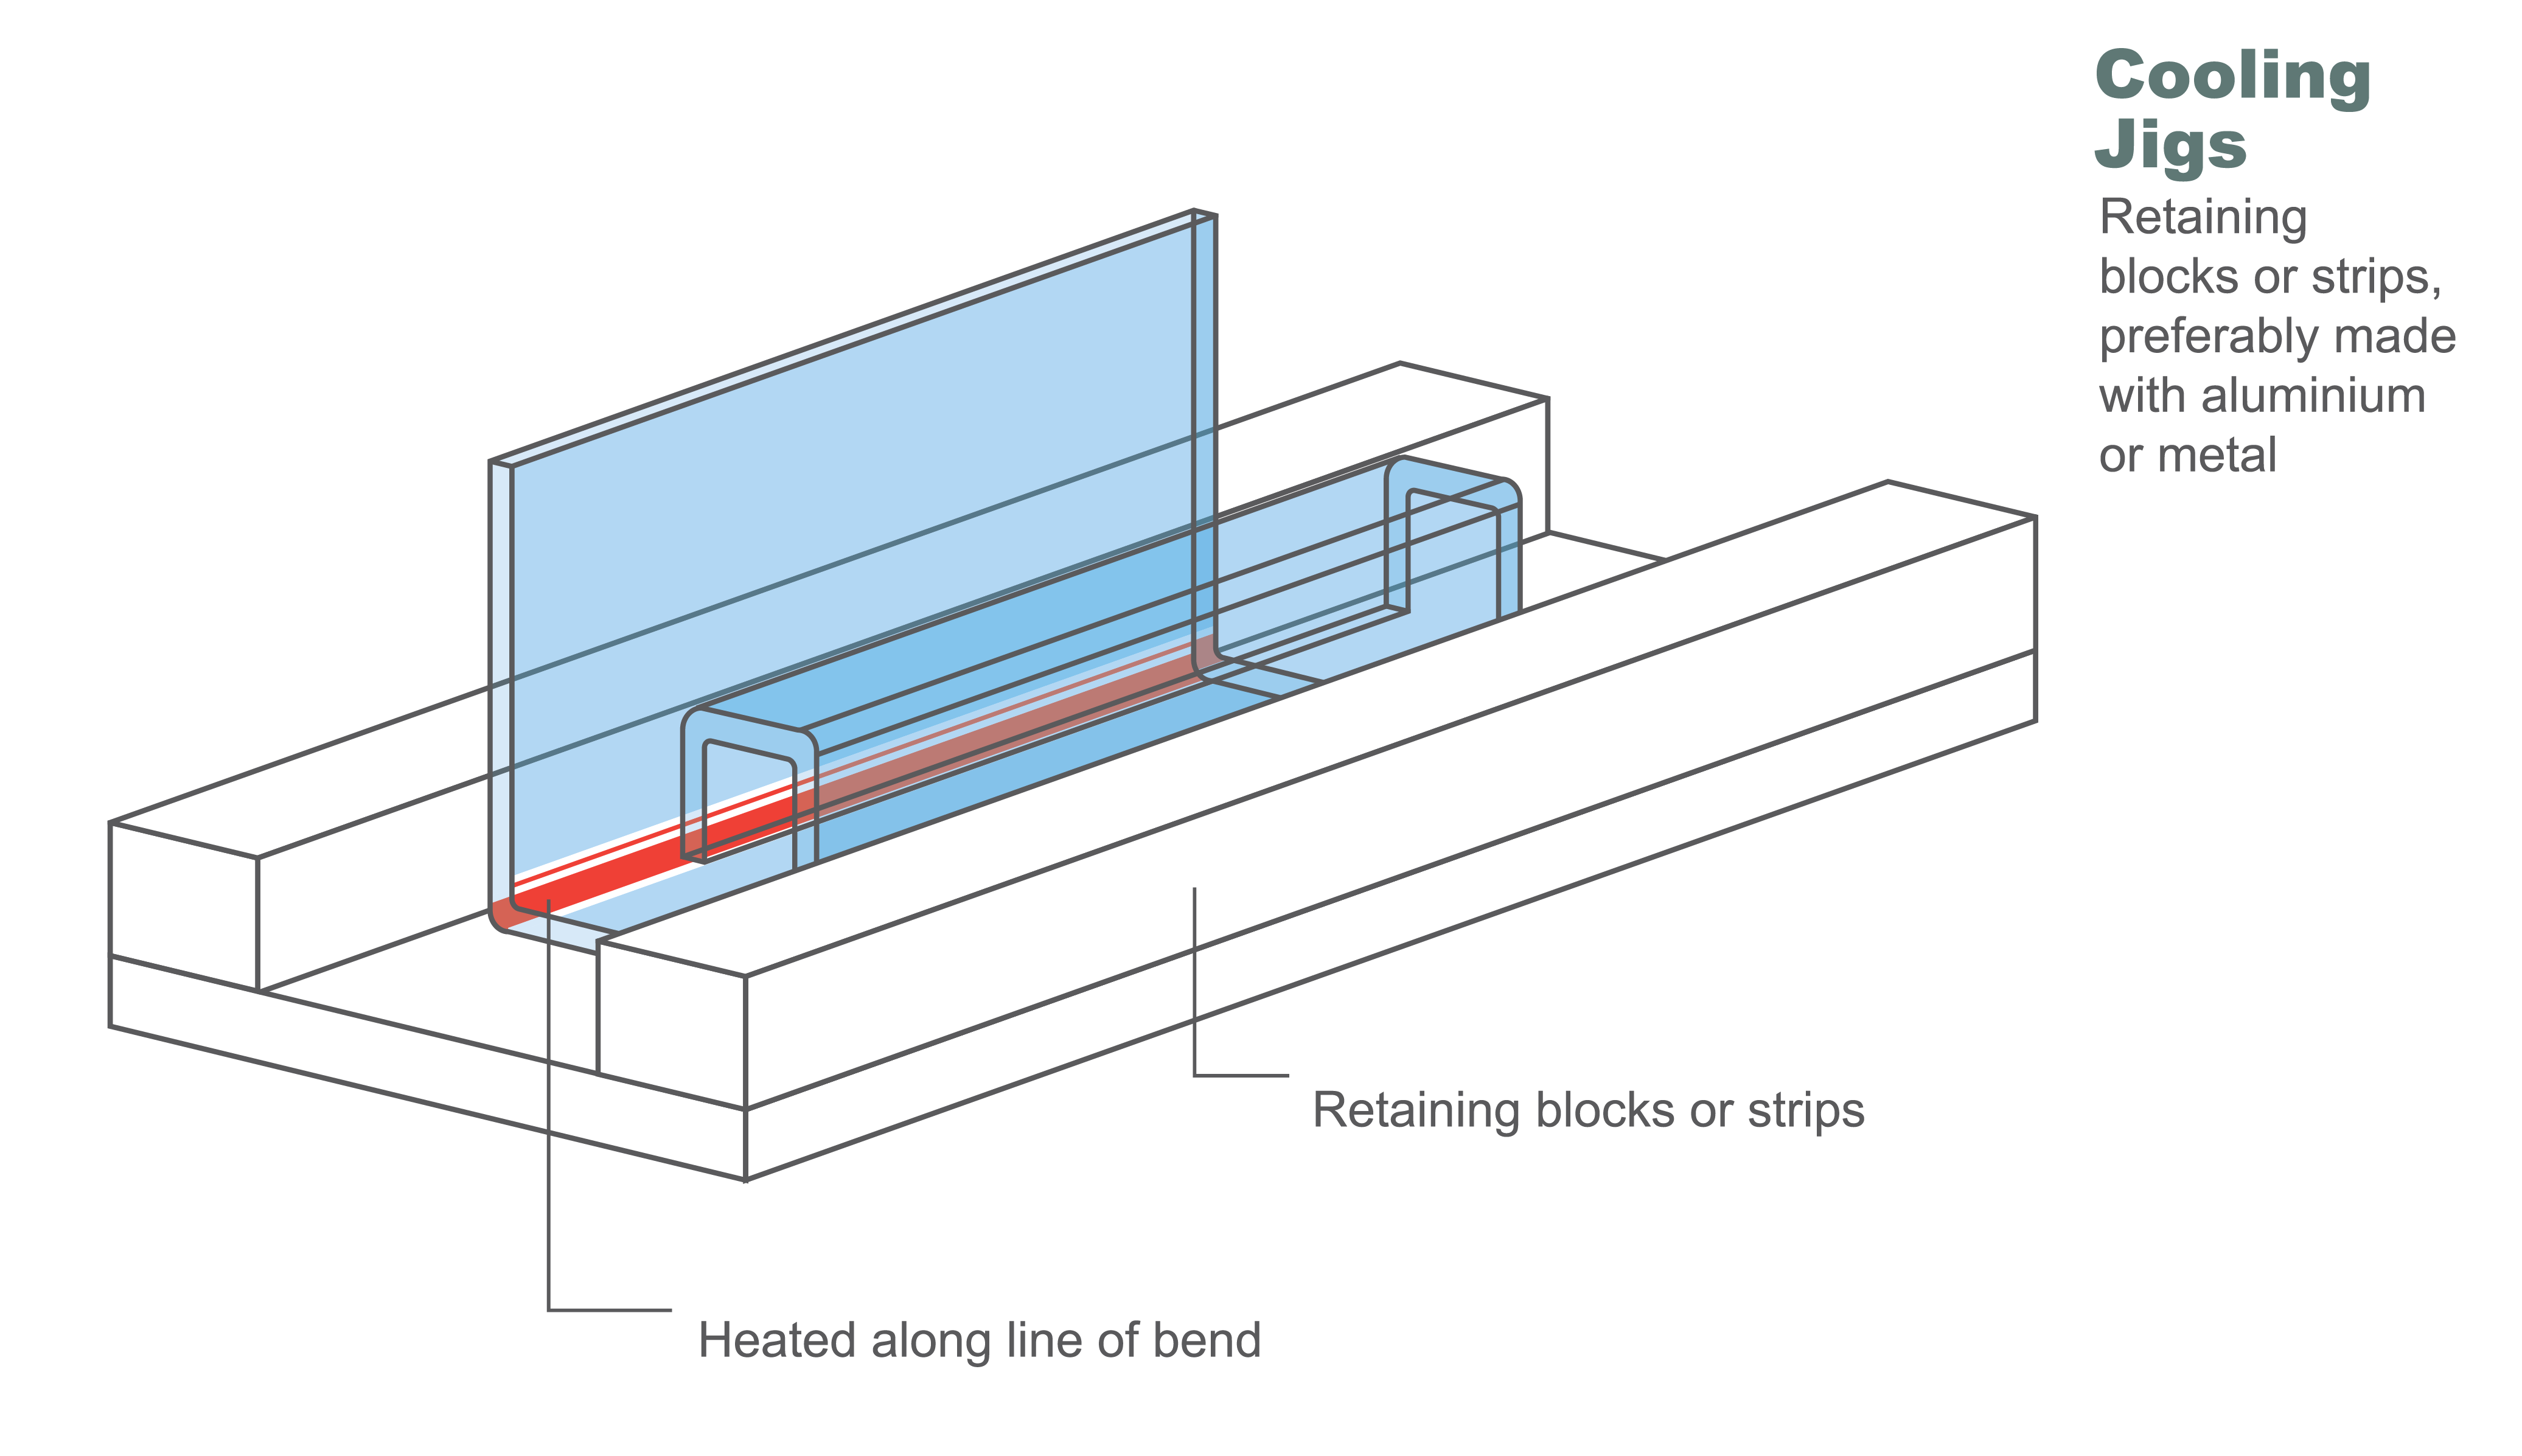
A cooling jig assures that your bend is at the proper angle and to prevent the piece from “springing back” into its original shape. On the left is an all-purpose jig for 90° bends. You can modify it to suit the part. A cooling jig which exposes both sides of the heated sheet to air (right) will accelerate cooling and reduce stresses. The sheet springs back slightly when released, so it must be bent slightly further than is required in the finished article. ASTARIGLAS® may shrink along the line of heating, therefore some bowing may be expected where there are narrow flanges.
 Sharp Line Bends
For sharp line bends with no deflection, it’s a good idea to v-groove the sheet, as show above. Use a v-rabbet router bit or a table saw; making two opposed 45° cuts. To have a bigger fold radius, make the cut approximately 1/3 of the sheet thickness, and to have a sharper line bends, cut the v-groove deeper. V-grooving the sheet reduces the material cross-section at the point of bending, reducing stresses and making bending easier. A wire heater beneath the cut will help create a sharp angle bend without deflections or bowing.
THERMOFORMING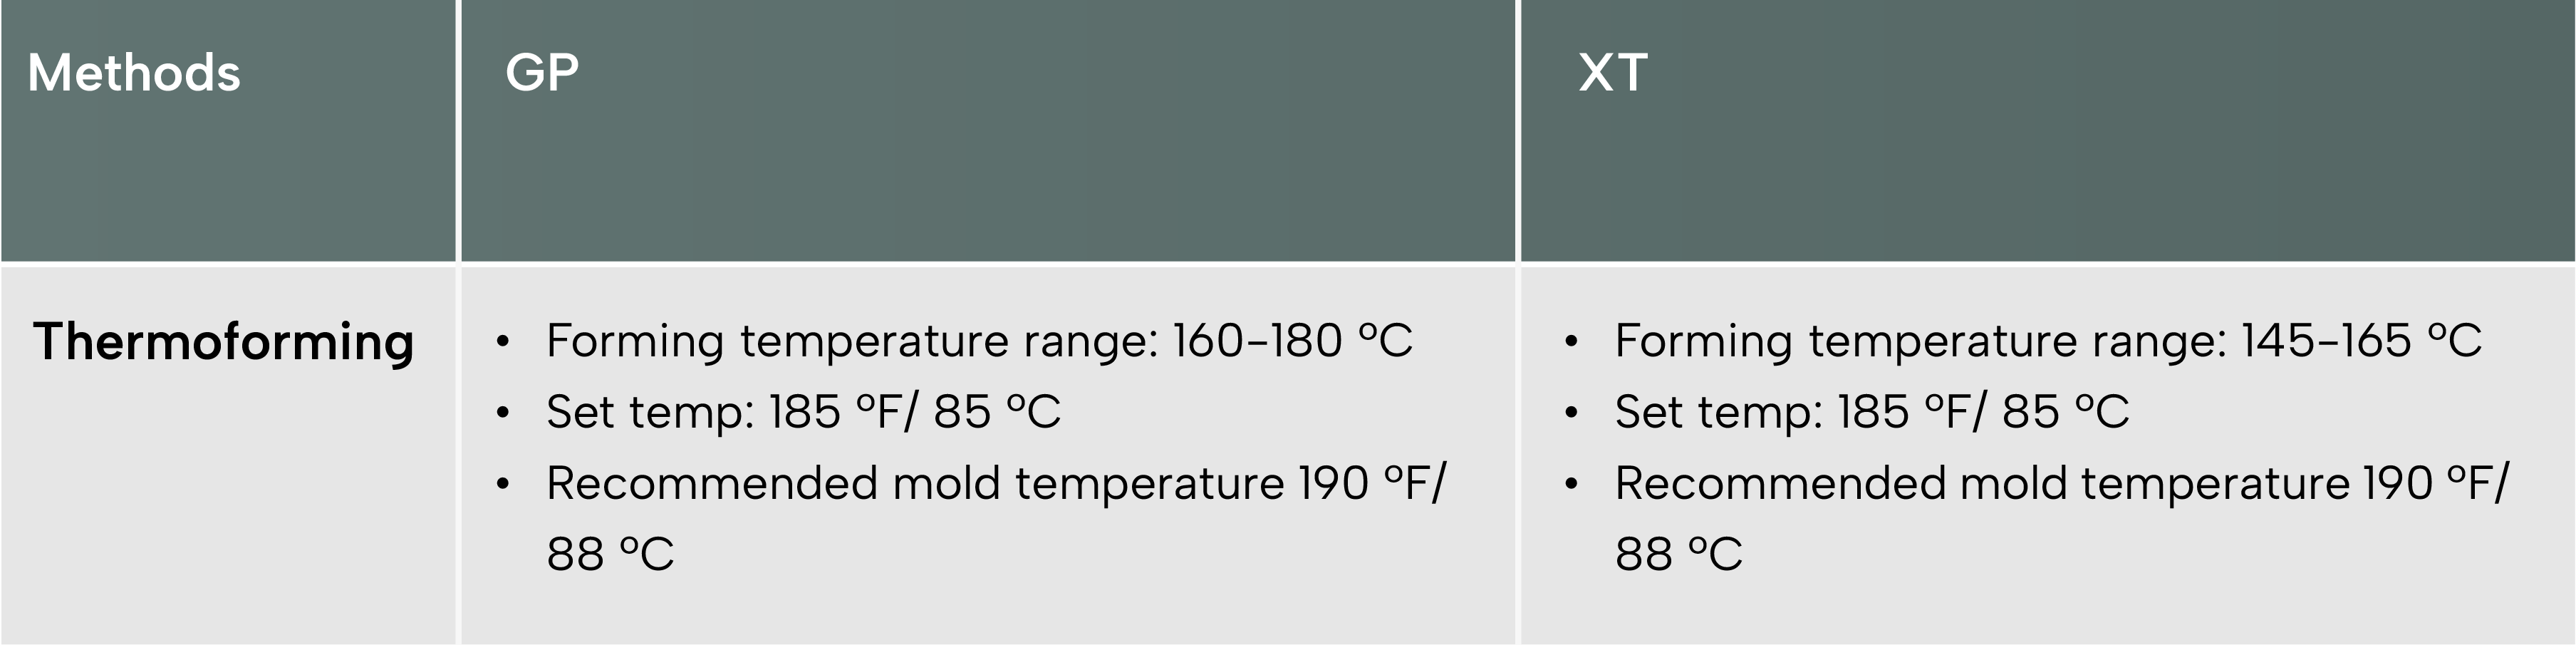
Another way of shaping ASTARIGLAS® is by thermoforming. It is a manufacturing process where a plastic sheet is heated to a pliable forming temperature, formed to a specific shape in a mould, and trimmed to create a usable product. The sheet temperature is critical. If not heated enough, the sheet will not acquire good part definition, too hot and the acrylic will pick up mark-off from minor imperfections in the mould. Mould temperature is also important for good part definition, and to provide gradual cooling to minimize stress and crazing When ASTARIGLAS® is first heated to thermoforming temperature its shrinks to 2% smaller after cooling in both length and breadth and approximately 4% thicker. If the sheet is subsequently re-heated, no further change occurs. There should be a few adjustments and allowance when cutting ASTARIGLAS® to size before thermoforming.
Finishing ASTARIGLAS® can be achieved by polishing a treated acrylic surface. There are several steps to buff or polish ASTARIGLAS® surface:
Polishing ASTARIGLAS® edge using buffing wheel has the same process as polishing acrylic surface. The edges must be sanded to a certain level of grade before using the buffing wheels.
Diamond Polishing ASTARIGLAS® will help to obtain high quality polished edge in large quantity.
Edges of acrylic sheets are moved over sharp with fast-rotating diamonds. Polishing result is so good that can be compared with cast surfaces. The method is relatively inexpensive. It is suitable for large batches.
Straight and sloping edges only.
You can use soap solution to remove any dirt, oil or grease on the sheet.